Carrying out work orders#
This is the heart of field work: doing the job and documenting it while you’re in it.
Opening a work order#
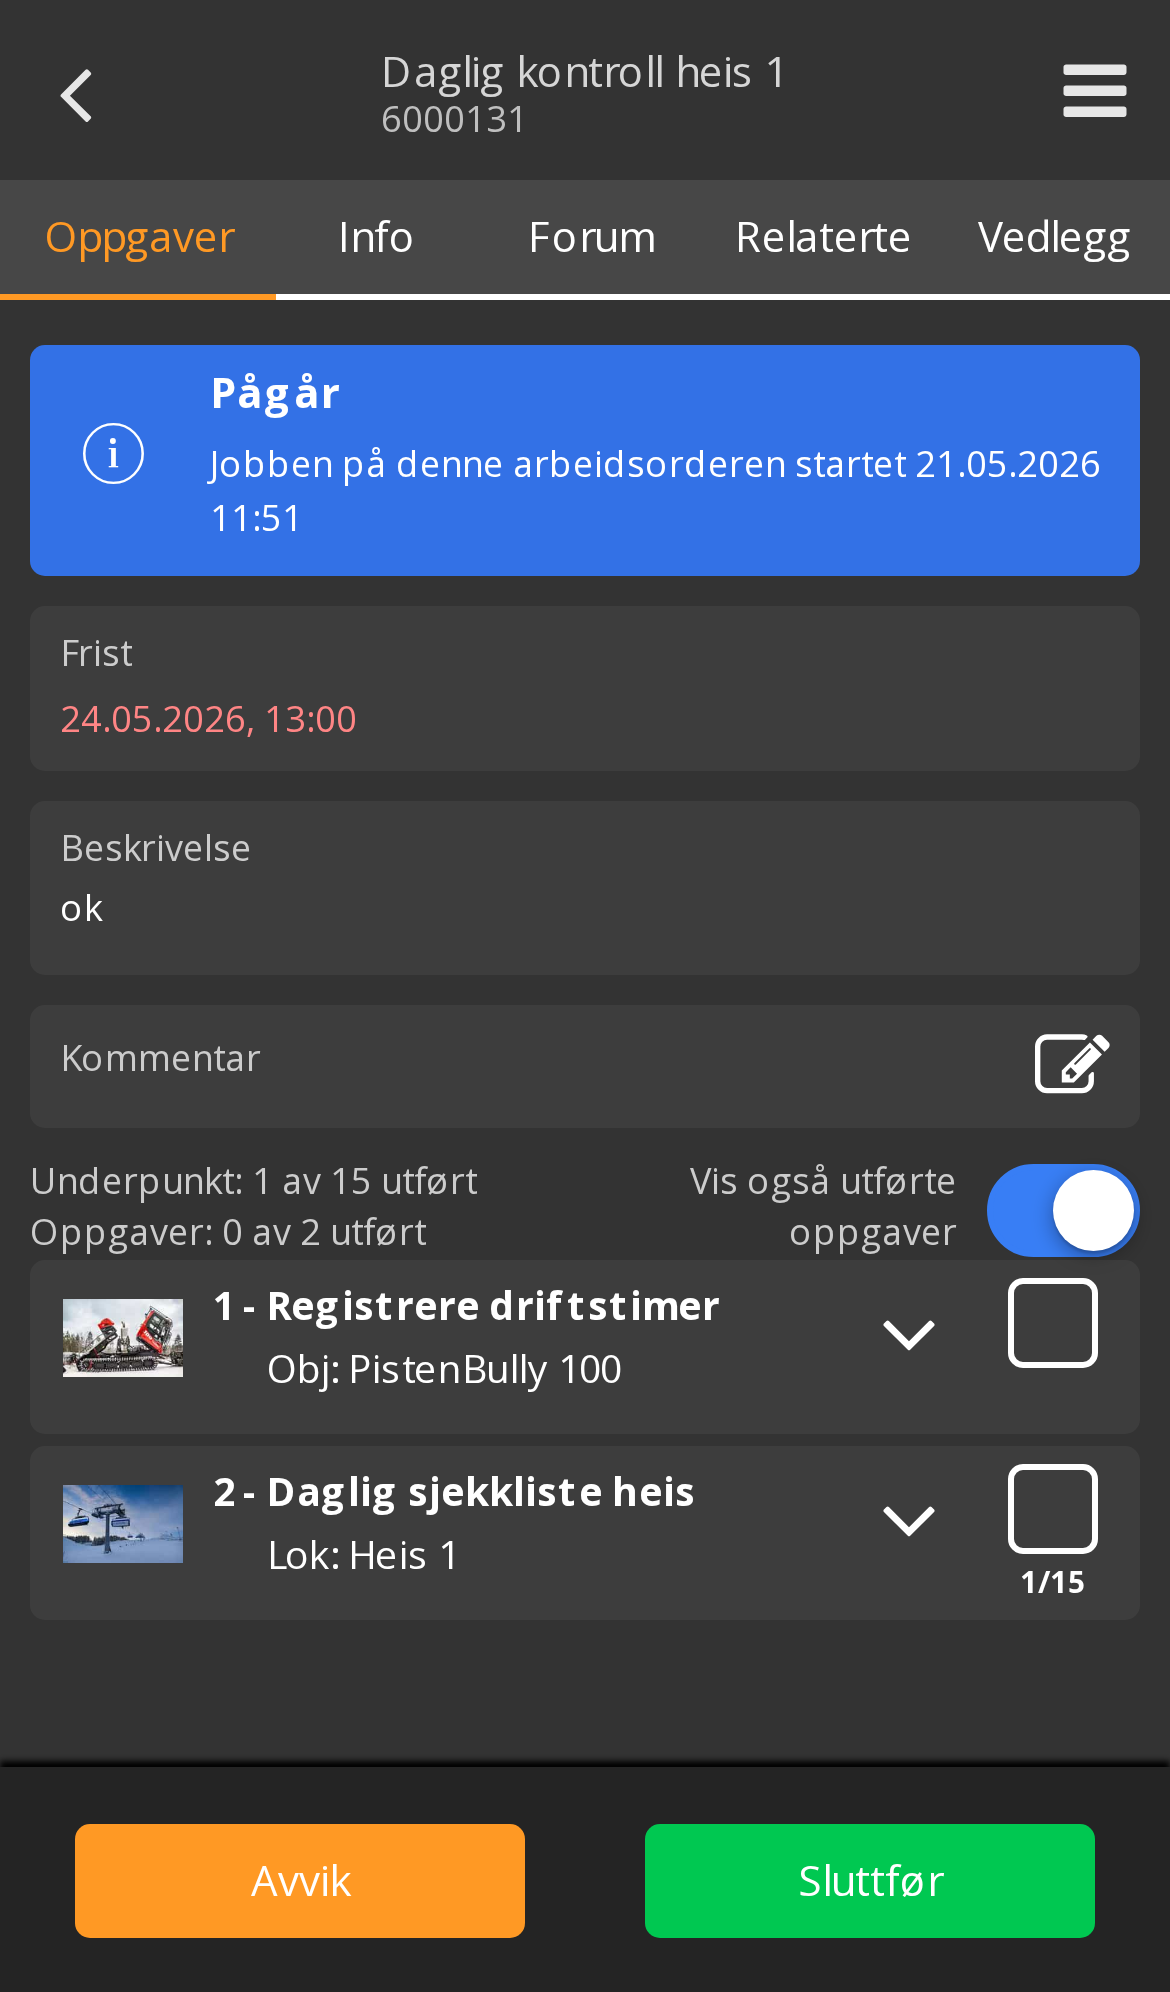
In the app: tap the work order in the list and it opens full screen. This is how you work in the field.
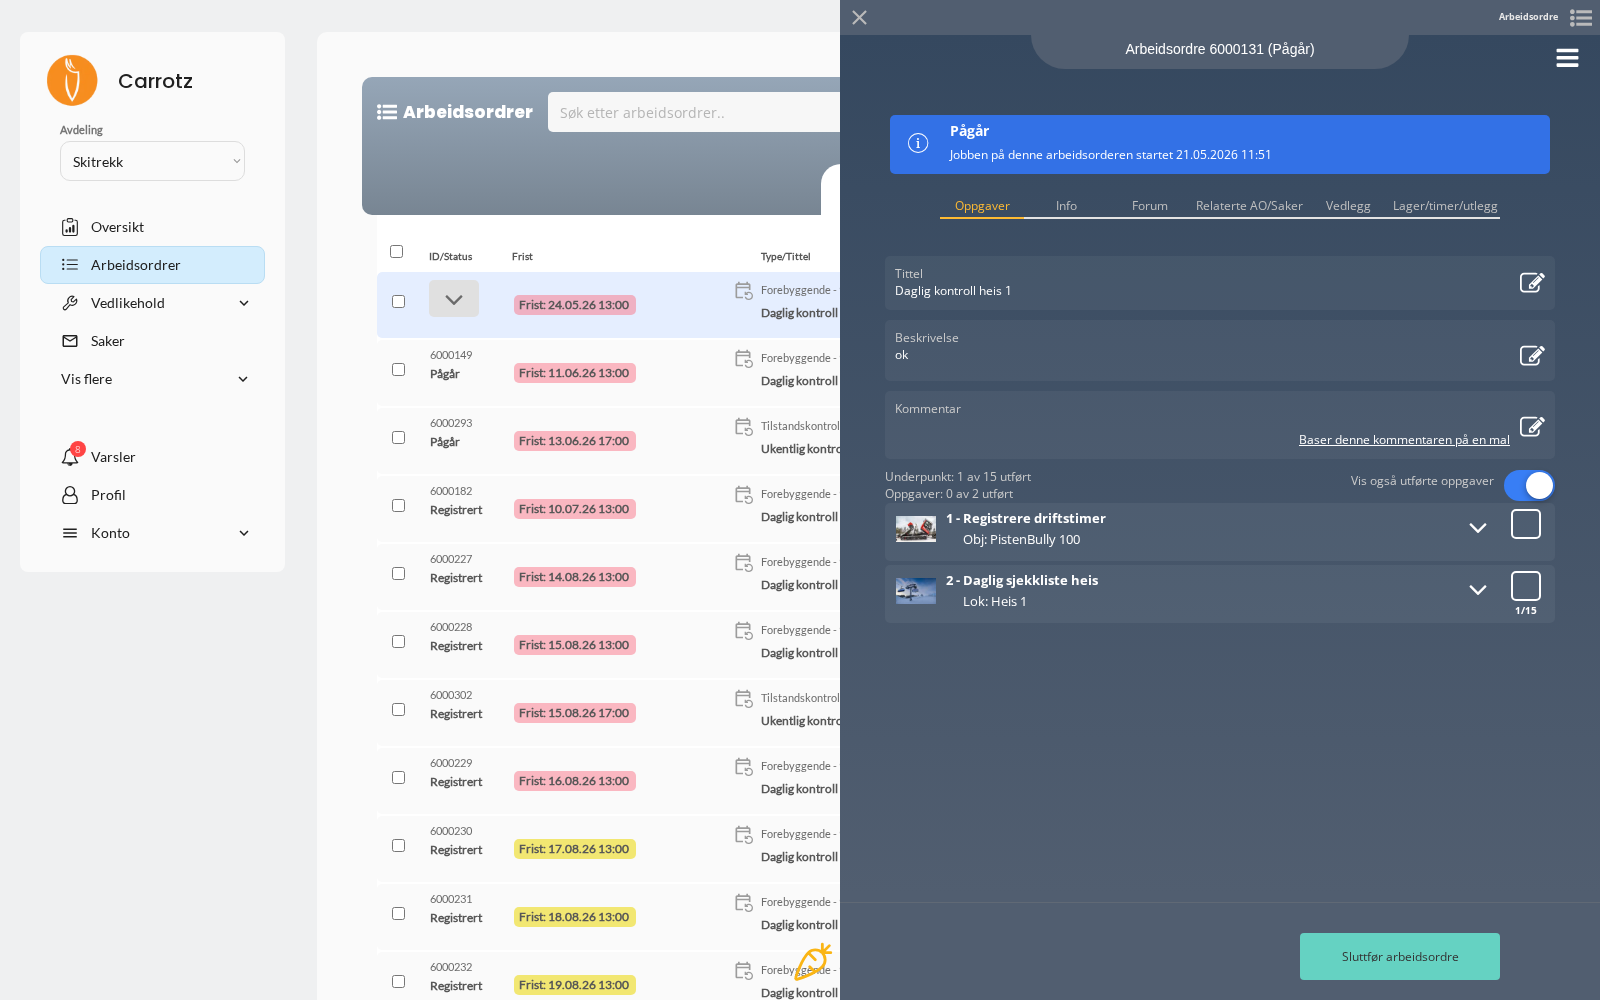
On desktop: click the row itself in the list. The work order slides out in a panel on the right while the list stays behind — handy when you’re working through many in a row.
Tabs in the work order#
| Tab | What you’ll find |
|---|---|
| Tasks | The work itself — what you work through |
| Info | Deadline, priority, assignee, location, object, work type |
| Forum | Discussion about the job, where you can tag colleagues |
| Related WOs/Cases | Other work orders and cases connected to this one |
| Attachments | Photos and files attached to the work order |
| Inventory/hours/expenses | Materials, time registration and expenses |
Tasks and sub-items — two levels#
This is the most important structure to understand:
Work order
├── Task 1 — Record running hours       (Obj: PistenBully 100)
└── Task 2 — Daily lift checklist       (Loc: Lift 1)
    ├── Sub-item 1
    ├── Sub-item 2
    └── … 15 sub-items
A work order consists of tasks. Each task is tied to either an object or a location — that is how the work ends up in the right history.
If the task is a checklist, it also consists of sub-items. That’s why the work order shows two counters:
- “Tasks: 0 of 2 done” — how many of the tasks are finished
- “Sub-items: 1 of 15 done” — how many individual points you’ve signed off
A task only counts as done once it has been signed off.
Three types of task#
| Type | What you do |
|---|---|
| Simple task | Only a title and description — no sub-items. Do it and sign off |
| Checklist | Work through the sub-items one by one |
| Meter reading | Record a value on a measuring point. The value can also be entered on the object or the measuring point directly — see Measuring points and triggers |
Whatever the type, the task is tied to one object or one location. If the work order has several tasks, they can point at different equipment — which is why each task shows “Obj:” or “Loc:” underneath.
Inside a task#
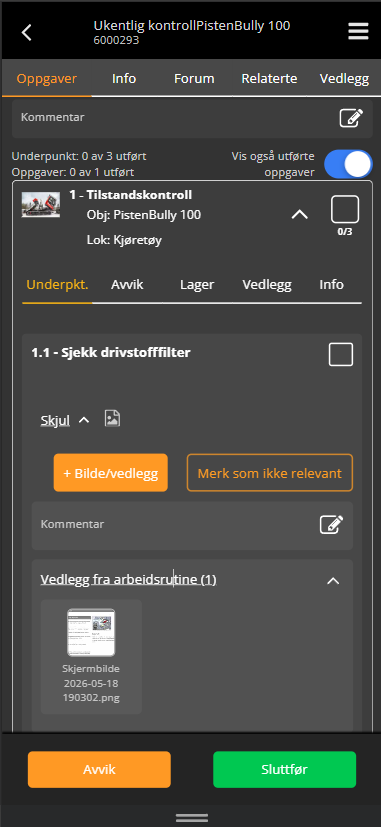
Tap the task row to open it. If the task has a checklist, you get the sub-items — this is where the work is signed off.
Tabs inside the task#
| Tab | What you do there |
|---|---|
| Sub-items | Tick off the points one by one |
| Deviations | Record deviations you spot while in the task |
| Inventory | Record materials used |
| Attachments | View and upload attachments for the whole task |
| Info | See the task details |
Ticking off a sub-item#
Each sub-item has a checkbox on the right. Tap it to approve the point.
Need more detail? Tap “Show” below the point title. That gives you:
| What it does | |
|---|---|
| + Photo/attachment | Uploads a photo or file to this point |
| Mark as not relevant | The point doesn’t apply this time |
| Comment | Add a note to the point |
| Attachments from work routine | Shows the documentation that comes with the checklist — instruction, photo or PDF explaining what to check |
“Attachments from work routine” is not the same as your own attachments. It is the reference material the administrator has attached to the point — read it before you tick off. Your own photos go in with + Photo/attachment.
Ticking off a whole task#
The task row has its own checkbox in the top right, with a counter beside it — for example 0/3. It shows how many sub-items have been signed off.
Once all sub-items are handled, the task can be marked as done from there, so you don’t have to go back.
Completed tasks are hidden by default. The “Show completed tasks too” switch brings them back. If you’re wondering where a task you just signed off went, that’s usually it.
The counters at the top#
The work order shows two counters, and they don’t mean the same thing:
- “Sub-items: 0 of 3 done” — individual points in the checklists
- “Tasks: 0 of 1 done” — the tasks as a whole
A task only counts as done once it’s been signed off — not automatically because its points are ticked.
Deviations and completion sit at the bottom#
At the bottom of the screen two buttons sit in their own bar, always available while you work:
- Deviation — record a deviation without leaving the task
- Complete — close the work order
The action menu#
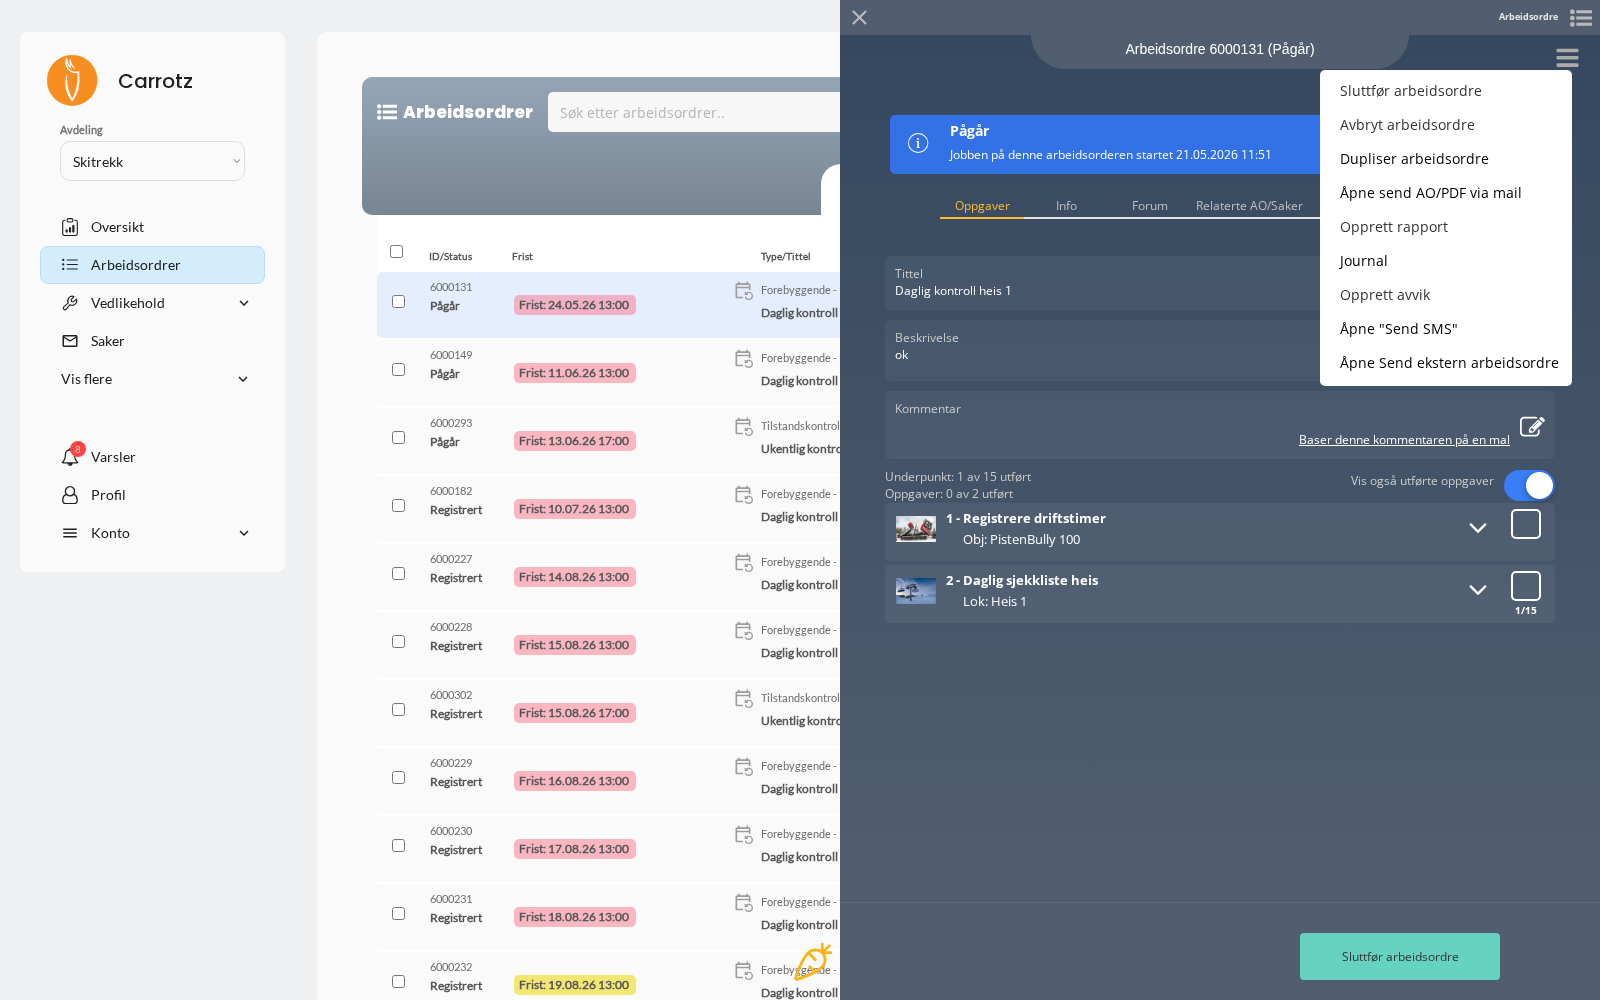
Open the work order on desktop and you’ll find a hamburger icon in the top right of the panel. It holds the actions that don’t belong in the main flow:
| Action | What it does |
|---|---|
| Complete work order | Same as the button at the bottom |
| Cancel work order | Sets the status to Cancelled |
| Duplicate work order | Makes a copy — useful when the same job recurs |
| Send WO/PDF by email | Sends the work order as an email |
| Create report | Generates a report from the work order |
| Journal | See the full history, below |
| Create deviation | Record a case linked to the job |
| Send SMS | Notify someone by SMS |
| Send external work order | Send the job to an external party |
The journal — what actually happened#
Every work order has a journal that logs changes and activity: status changes, who did what, and when.
To open it (desktop): open the work order in the side panel, tap the hamburger icon in the top right, and choose Journal. It opens in its own window.
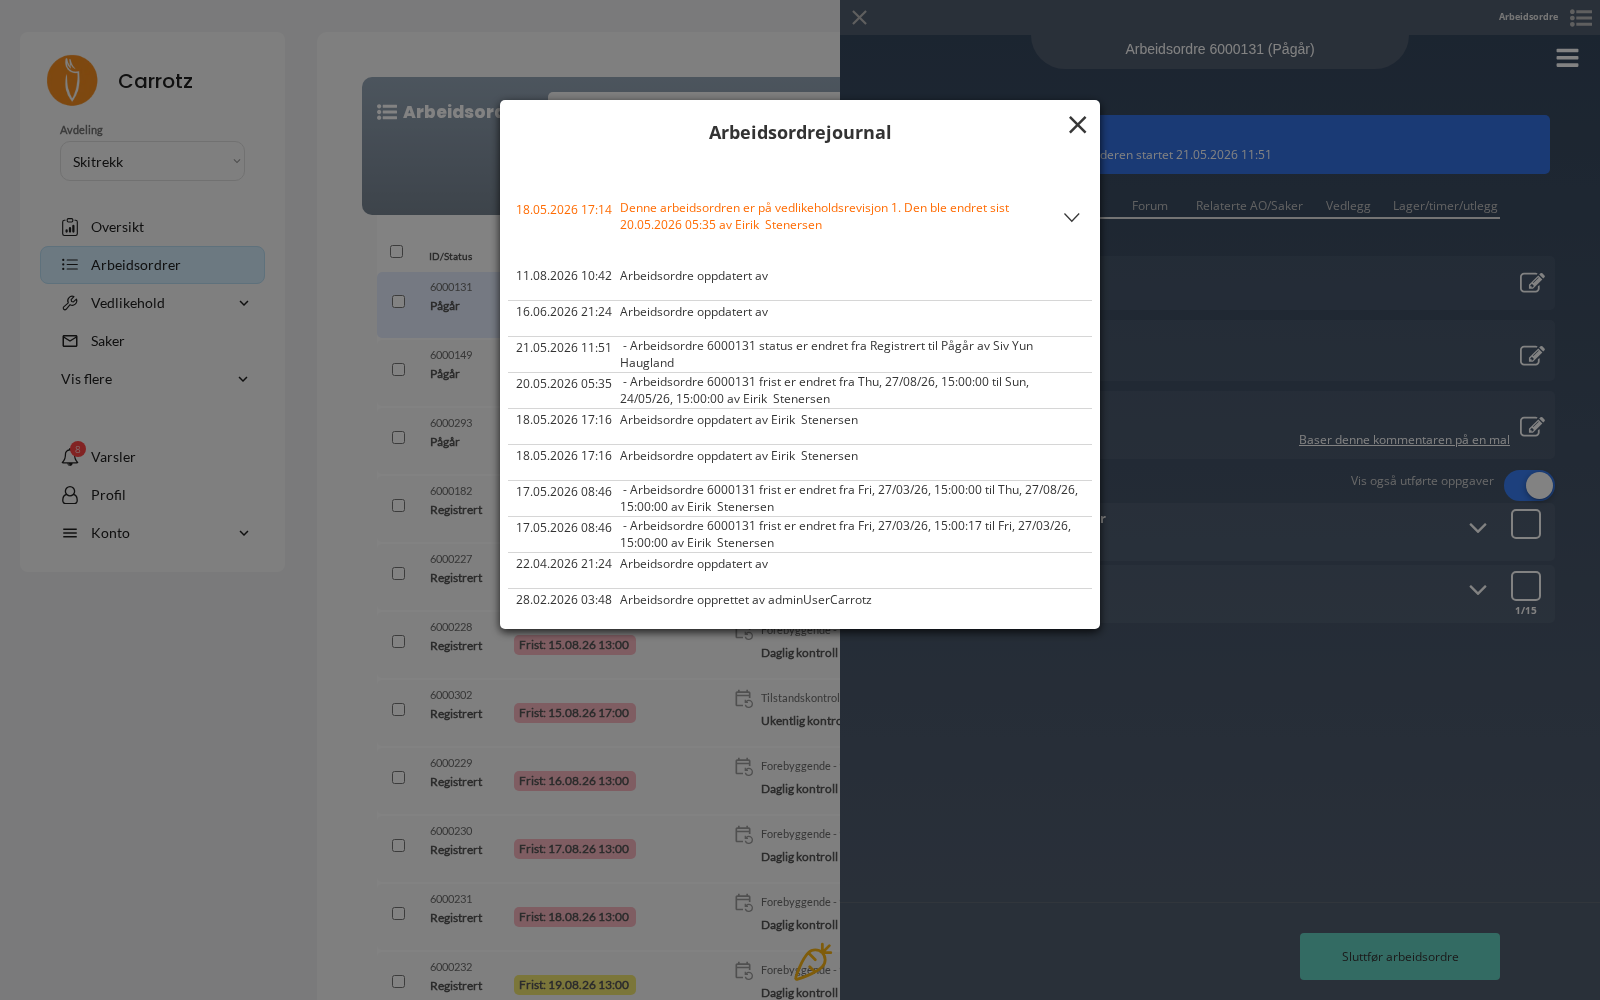
The journal is the place to start when something looks odd — a job suddenly marked rejected, a deadline that moved, or a question about who did what. It answers that without anyone having to remember.
Comments and templates#
When writing a comment on the work order, you can base it on a template. That’s useful for recurring wording — standard condition descriptions, fixed deviation phrasing, reporting text that should be the same every time.
The template is a starting point. Edit it so it describes what you actually did.
JSA — fill it in before you start#
If the job requires a JSA (Job Safety Analysis), it must be completed before you can start the work order.
A JSA is valid for 24 hours. If it’s older than that, it must be filled in again.
If the job spans several days, that means a new JSA each day. Fill it in when you’re actually about to begin — not the evening before.
You can complete it both in the app and on desktop. See JSA and risk assessment for what it contains.
Documenting as you go#
Everything you record while working becomes history on the object or location:
- Comments — what you actually did, not just that it was done
- Photos — before/after, condition, serial numbers, anything hard to describe
- Hours, materials and expenses — under the Inventory/hours/expenses tab
- Attachments — documentation, measurement reports, receipts
- Forum — questions along the way, where you can tag a colleague
Completing#
Your organisation can require certain rules to be met before you can complete:
| Rule | What it requires |
|---|---|
| All tasks completed | No tasks left unhandled |
| Comment or attachment recorded | Something is documented on the job |
| Inventory usage confirmed | Materials are recorded |
| JSA completed | The risk assessment is done |
| Sent for approval | The work order goes to an approver |
The dialog when you tap Complete#
Tap Complete at the bottom and you get a summary of what remains — for example “0 of 2 tasks completed” — with three choices:
| Choice | When to use it |
|---|---|
| Go to tasks | You forgot something and want to finish it first |
| Cancel | You’re not done yet |
| Complete anyway | The job really is finished, even if not every point is ticked |
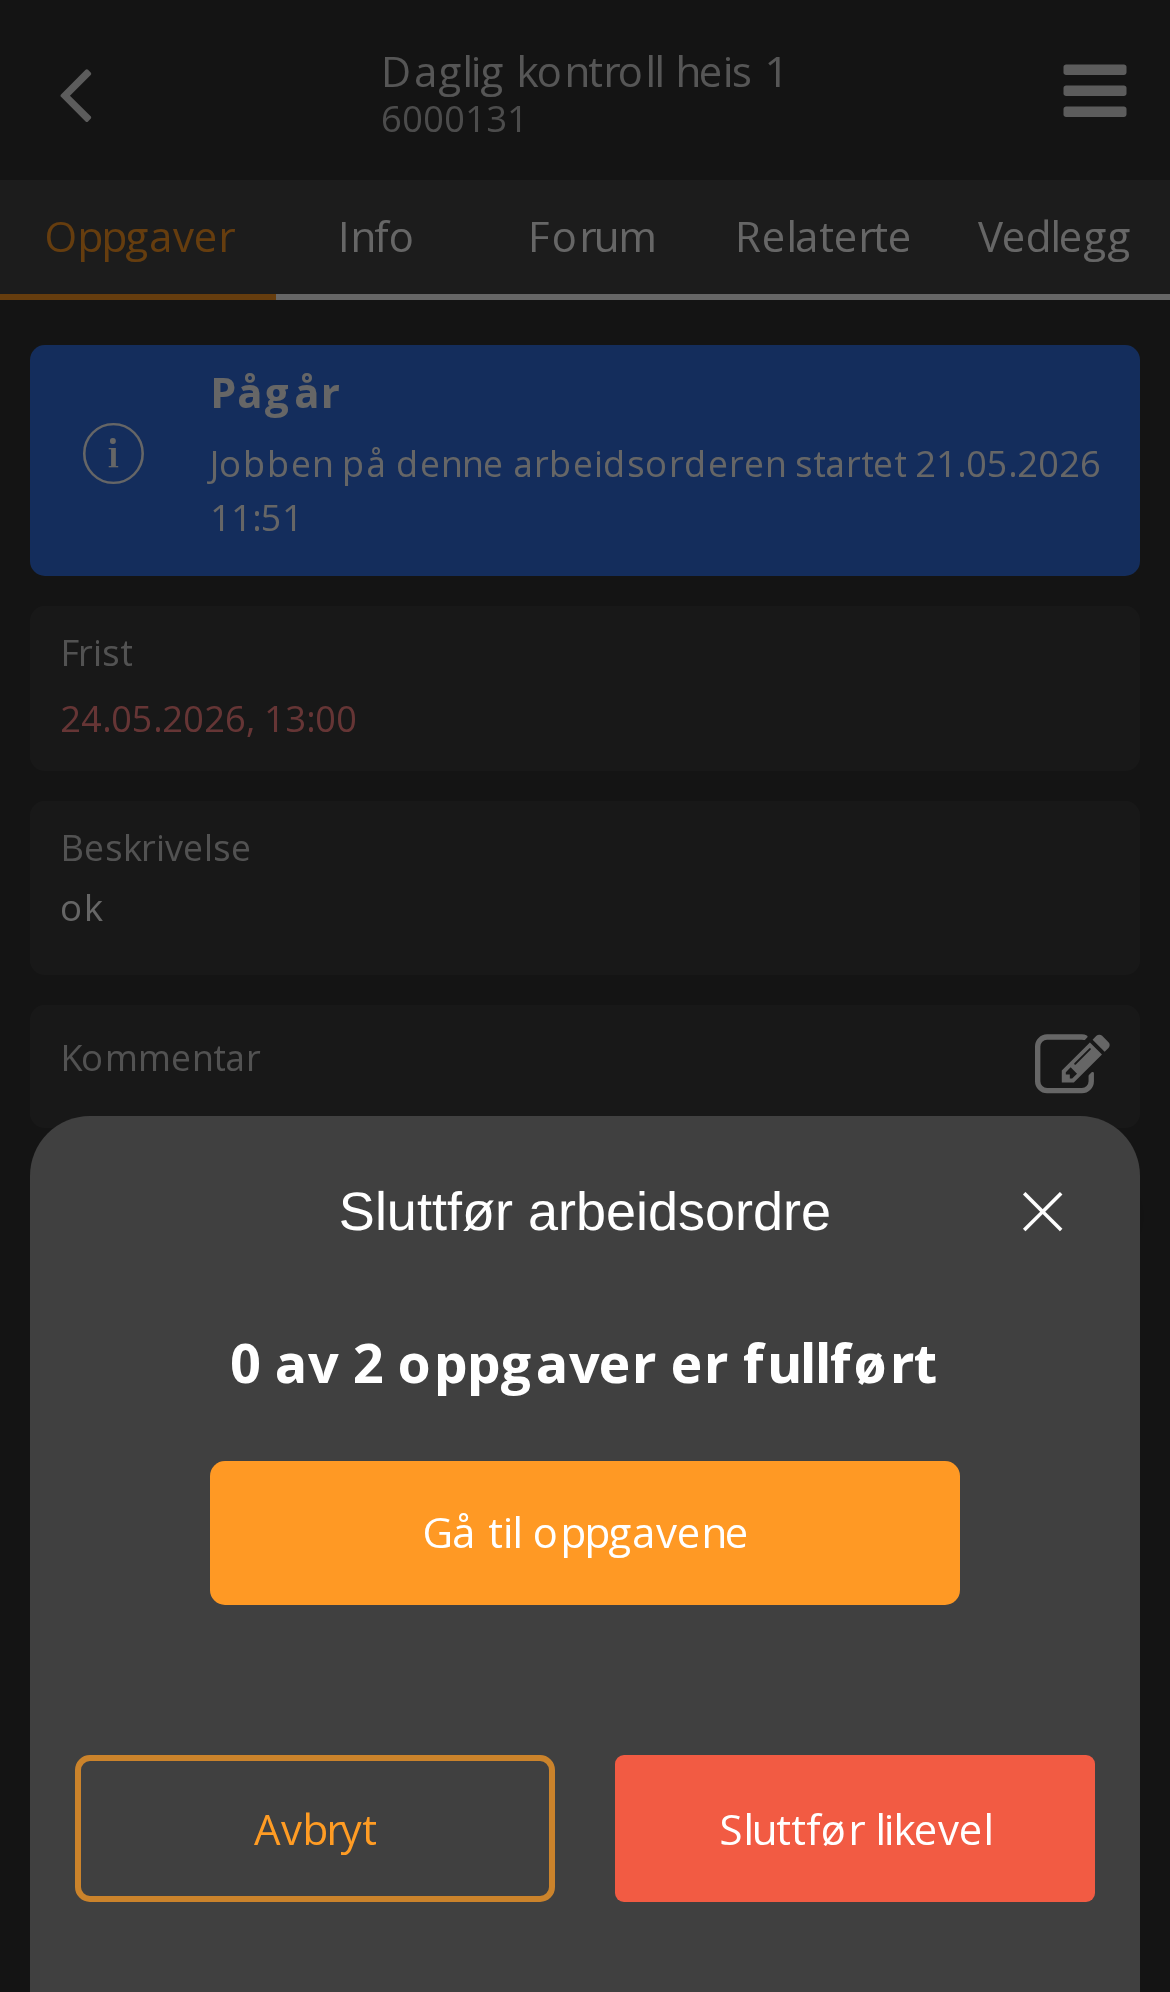
“Complete anyway” is a real option — not an error. The system warns you, but doesn’t stop you. If you use it, write a comment explaining why. Otherwise the history looks like a job where half the checklist was skipped, and nobody knows whether that was a judgement call or an oversight.
Depending on your organisation’s setup, some rules may block more firmly than this.
Inventory usage only applies if your organisation has the inventory module in its package. Without it, you won’t see that rule at all.
Which rules apply is configured by the administrator — as defaults for maintenance plans, and as rules for one-off jobs. Rules can also be overridden on the individual maintenance plan, so two jobs in the same organisation can have different requirements.
If you can’t complete, look for the message the system gives — it usually points straight at the rule that isn’t satisfied.
Approval#
If your organisation uses approval of completed work orders, the job goes to Awaiting approval when you complete it. Who approves is defined on the work order or on the maintenance plan it came from.
From there one of two things happens:
- Approved — the job is finally finished
- Rejected — something is missing
If the work order is rejected, it is automatically set back to In progress and you are notified. There’s normally a comment explaining what’s missing — fix it and complete again.
See Statuses for the full status flow.